Vue之生命周期钩子浅析
Vue生命周期简介
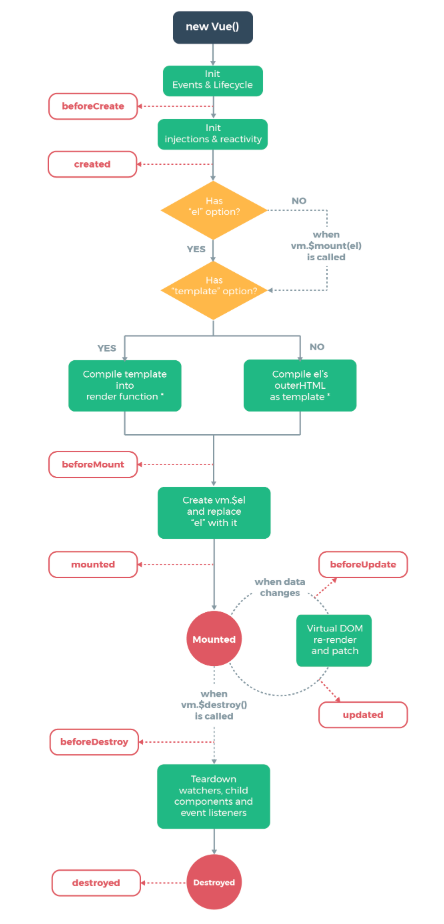
下图是Vue官网的生命周期图:
Vue1.0 VS Vue2.0 生命周期
| vue1.0+ | Vue2.0 | 说明 |
|---|---|---|
| init | beforeCreate | 组件实例创建前,组件属性计算之前 |
| created | created | 组件实例创建完成,属性已绑定,但Dom未生成,$el不存在 |
| beforeComplie | beforeMount | 模板编译/挂载之前 |
| complied | mounted | 模板编译/挂载之后 |
| ready | mounted | 模板编译/挂载之后 |
| - | beforeUpdate | 组件更新之前 |
| - | updated | 组件更新之后 |
| - | activated | for keep-alive ,组件被激活时调用 |
| - | deactivated | for keep-alive ,组件被移除时调用 |
| attached | - | - |
| detached | - | - |
| beforeDestory | beforeDestory | 组件销毁前调用 |
| Destroyed | Destroyed | 组件销毁后调用 |
生命周期探究
1
2
3
4
5
6
7
8
9
10
11
12
13
14
15
16
17
18
19
20
21
22
23
24
25
26
27
28
29
30
31
32
33
34
35
36
37
38
39
40
41
42
43
44
45
46
47
48
49
50
51
52
53
54
55
56
57
58
59
60
61
62
63
64
65
66
67
68
69
70
71
72
73
74
75
76
77
<!DOCTYPE html>
<html>
<head>
    <title></title>
    <script type="text/javascript" src="https://cdn.jsdelivr.net/vue/2.1.3/vue.js"></script>
</head>
<body>

<div id="app">
     <p></p>
</div>

<script type="text/javascript">

  var app = new Vue({
      el: '#app',
      data: {
          message : "xuxiao is boy"
      },
       beforeCreate: function () {
                console.group('beforeCreate 创建前状态===============》');
               console.log("%c%s", "color:red" , "el     : " + this.$el); //undefined
               console.log("%c%s", "color:red","data   : " + this.$data); //undefined
               console.log("%c%s", "color:red","message: " + this.message)
        },
        created: function () {
            console.group('created 创建完毕状态===============》');
            console.log("%c%s", "color:red","el     : " + this.$el); //undefined
               console.log("%c%s", "color:red","data   : " + this.$data); //已被初始化
               console.log("%c%s", "color:red","message: " + this.message); //已被初始化
        },
        beforeMount: function () {
            console.group('beforeMount 挂载前状态===============》');
            console.log("%c%s", "color:red","el     : " + (this.$el)); //已被初始化
            console.log(this.$el);
               console.log("%c%s", "color:red","data   : " + this.$data); //已被初始化
               console.log("%c%s", "color:red","message: " + this.message); //已被初始化
        },
        mounted: function () {
            console.group('mounted 挂载结束状态===============》');
            console.log("%c%s", "color:red","el     : " + this.$el); //已被初始化
            console.log(this.$el);
               console.log("%c%s", "color:red","data   : " + this.$data); //已被初始化
               console.log("%c%s", "color:red","message: " + this.message); //已被初始化
        },
        beforeUpdate: function () {
            console.group('beforeUpdate 更新前状态===============》');
            console.log("%c%s", "color:red","el     : " + this.$el);
            console.log(this.$el);
               console.log("%c%s", "color:red","data   : " + this.$data);
               console.log("%c%s", "color:red","message: " + this.message);
        },
        updated: function () {
            console.group('updated 更新完成状态===============》');
            console.log("%c%s", "color:red","el     : " + this.$el);
            console.log(this.$el);
               console.log("%c%s", "color:red","data   : " + this.$data);
               console.log("%c%s", "color:red","message: " + this.message);
        },
        beforeDestroy: function () {
            console.group('beforeDestroy 销毁前状态===============》');
            console.log("%c%s", "color:red","el     : " + this.$el);
            console.log(this.$el);
               console.log("%c%s", "color:red","data   : " + this.$data);
               console.log("%c%s", "color:red","message: " + this.message);
        },
        destroyed: function () {
            console.group('destroyed 销毁完成状态===============》');
            console.log("%c%s", "color:red","el     : " + this.$el);
            console.log(this.$el);
               console.log("%c%s", "color:red","data   : " + this.$data);
               console.log("%c%s", "color:red","message: " + this.message)
        }
    })
</script>
</body>
</html>
执行上述代码,结果如下:
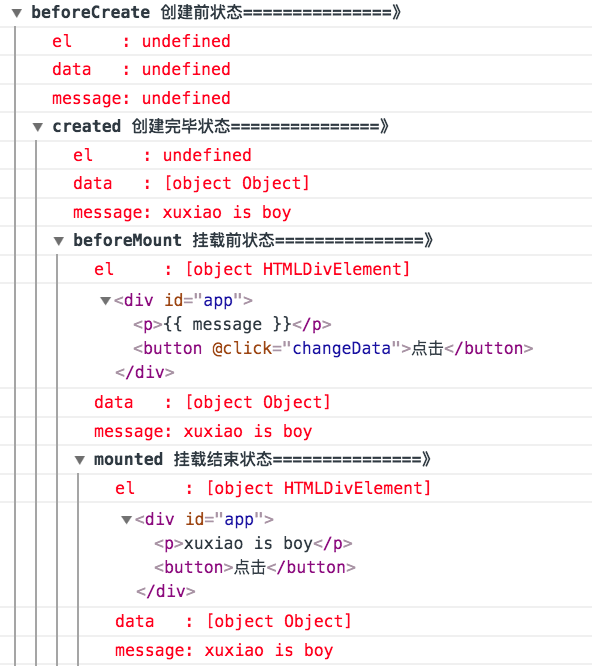
说明以下:
- beforeCreate: el 和data 并未初始化,都为undefined;
- created: 完成data数据初始化,el还没有;
- beforeMount: 完成了 el 和data的初始化,并且此时为虚拟dom;
-
mounted: 完成挂载,渲染数据进去成为实际Dom节点;
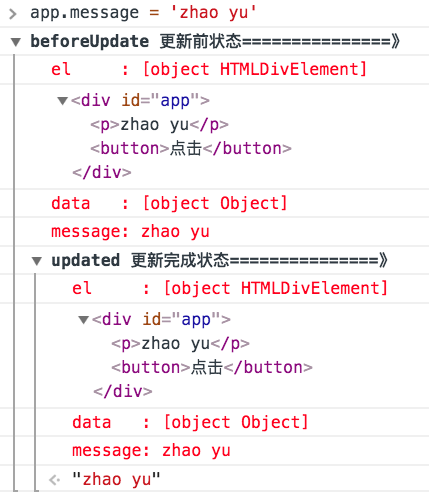
- beforeUpdate: 数据更新时调用,发生在虚拟DOM重新渲染和打补丁之前, 你可以在这个钩子中进一步第更改状态,这不会触发附加的重渲染过程;
- updated: data里的值修改完成。当这个钩子被调用时,组件DOM已经更新,所以你现在可以执行依赖于DOM的操作。然而在大多数情况下,你应该避免在此期间更改状态,因为这可能会导致更新无限循环;
- beforeDestory: 确认删除XX吗?实例销毁之前调用,在这一步,实例仍然完全可用。;
- destoryed: 对data的改变不会再触发周期函数,此时的vue实例已经解除了事件监听以及和dom的绑定,但是dom结构依然存在。
执行app.$destory() ,可以销毁组件。
生命周期总结
-
ajax请求最好放在created里面,因为这时可以访问this了,请求到数据就可以直接放在data里了。碰到面试官问:ajax请求应该放在哪个生命周期。
-
关于dom的操作要放在mounted里面,在mounted前面访问dom是undefined。
-
每次进入/离开组件都要做一些事,用什么钩子?
-
不缓存:
进入的时候可以用created和mounted钩子,离开的时候用beforeDestory 和destoryed钩子。beforeDestory可以访问this,destoryed不可以访问this。
-
缓存了组件:
缓存了组件之后,再次进入组件不会触发beforeCreate、created 、beforeMount、 mounted,如果想每次进入组件都做一些事,可以放在activated进入缓存组件的钩子里。
同理,离开组件时也不会触发beforeDestroy和destroyed,可以使用deactivated离开缓存组件的钩子来代替。
-
-
触发钩子的完整顺序:
将路由导航、keep-alive、组件生命周期钩子结合起来,触发顺序,假设从a组件离开,第一次进入b组件:
1- beforeRouteLeave:路由组件的组件离开路由前钩子,可取消路由离开.
2- beforeEach:路由全局前置守卫,可用于登录验证、全局路由loading等。
3-beforeEnter:路由独享守卫
4-beforeRouteEnter:路由组件的组件进入路由前钩子.
5-beforeResolve:路由全局解析守卫
6-afterEach:路由全局后置钩子
7-beforeCreate:组件生命周期,不能访问this。
8-created:组件的生命周期,可以访问this,不可以访问dom
9-beforeMount: 组件生命周期
10-deactivated:离开缓存组件a,或者触发a的beforeDestroy和destroyed组件销毁钩子。
11-mounted:访问/操作dom。
12-activated:进入缓存组件,进入a的嵌套子组件(如果有的话)。
13- 执行beforeRouteEnter回调函数next。
end!